技術前提概要
1.React JSX
普通のJavaScriptに代わりに、ReactはJSXを使って、画面を開発する。
JSXはXMLに似ているJavaScript。
特点:
1.JSX実行早い、compileする時、エラーを検知する。
2.JSXはJavaScript内部に作動する。
2.React State
Reactはコンポーネントをステートマシンとして扱います。ユーザーとの対話を通じて、さまざまな状態が実現され、UIがレンダリングされて、ユーザーインターフェイスとデータの一貫性が保たれます。
Reactでは、コンポーネントの状態を更新してから、新しい状態に基づいてUIを再レンダリングします(DOMを操作しないでください)。
次の例では、名前がReact.Componentを拡張するES6クラスを作成し、render()メソッドでthis.stateを使用して現在の時刻を変更します。
クラスコンストラクターを追加して、状態this.stateを初期化します。クラスコンポーネントは、常にpropsを使用してベースコンストラクターを呼び出す必要があります。
class Clock extends React.Component {
  constructor(props) {
    super(props);
    this.state = {date: new Date()};
  }

  render() {
    return (
      <div>
        <h1>Hello, world!</h1>
        <h2>今は {this.state.date.toLocaleTimeString()}.</h2>
      </div>
    );
  }
}

ReactDOM.render(
  <Clock />,
  document.getElementById('example')
);
实例解析:
componentDidMount() 与 componentWillUnmount() 方法被称作生命周期钩子。

在组件输出到 DOM 后会执行 componentDidMount() 钩子,我们就可以在这个钩子上设置一个定时器。

this.timerID 为定时器的 ID,我们可以在 componentWillUnmount() 钩子中卸载定时器。

代码执行顺序:

当 <Clock /> 被传递给 ReactDOM.render() 时,React 调用 Clock 组件的构造函数。 由于 Clock 需要显示当前时间,所以使用包含当前时间的对象来初始化 this.state 。 我们稍后会更新此状态。

React 然后调用 Clock 组件的 render() 方法。这是 React 了解屏幕上应该显示什么内容,然后 React 更新 DOM 以匹配 Clock 的渲染输出。

当 Clock 的输出插入到 DOM 中时,React 调用 componentDidMount() 生命周期钩子。 在其中,Clock 组件要求浏览器设置一个定时器,每秒钟调用一次 tick()。

浏览器每秒钟调用 tick() 方法。 在其中,Clock 组件通过使用包含当前时间的对象调用 setState() 来调度UI更新。
通过调用 setState() ,React 知道状态已经改变,并再次调用 render() 方法来确定屏幕上应当显示什么。
这一次,render() 方法中的 this.state.date 将不同,所以渲染输出将包含更新的时间,并相应地更新 DOM。

一旦 Clock 组件被从 DOM 中移除,React 会调用 componentWillUnmount() 这个钩子函数,定时器也就会被清除。
3.React Props
State AND Props 親widgetにstateを設定、 親に子widgetを使って、そしてparameterに渡す。子widgetにpropsを使って、parameterを受ける 例:
class WebSite extends React.Component {
  constructor() {
      super();

      this.state = {
        name: "this is name ",
        site: "this is site"
      }
    }
  render() {
    return (
      <div>
        <Name name={this.state.name} />
        <Link site={this.state.site} />
      </div>
    );
  }
}


class Name extends React.Component {
  render() {
    return (
      <h1>{this.props.name}</h1>
    );
  }
}

class Link extends React.Component {
  render() {
    return (
      <a href={this.props.site}>
        {this.props.site}
      </a>
    );
  }
}

ReactDOM.render(
  <WebSite />,
  document.getElementById('example')
);
4.Reactイベント処理
React要素はDOM要素と同様にイベントを処理します。ただし、構文上の違いは少しあります。
Reactイベントバインディングプロパティは、小文字ではなくキャメルケースで名前が付けられています。 JSX構文を使用する場合は、文字列ではなく、イベントハンドラーとして関数を渡す必要があります(DOM要素の記述方法) HTMLは通常、次のように記述されます。
function ActionLink() {
  function handleClick(e) {
    e.preventDefault();
    console.log('link was clicked');
  }

  return (
    <a href="#" onClick={handleClick}>
      clike me
    </a>
  );
}
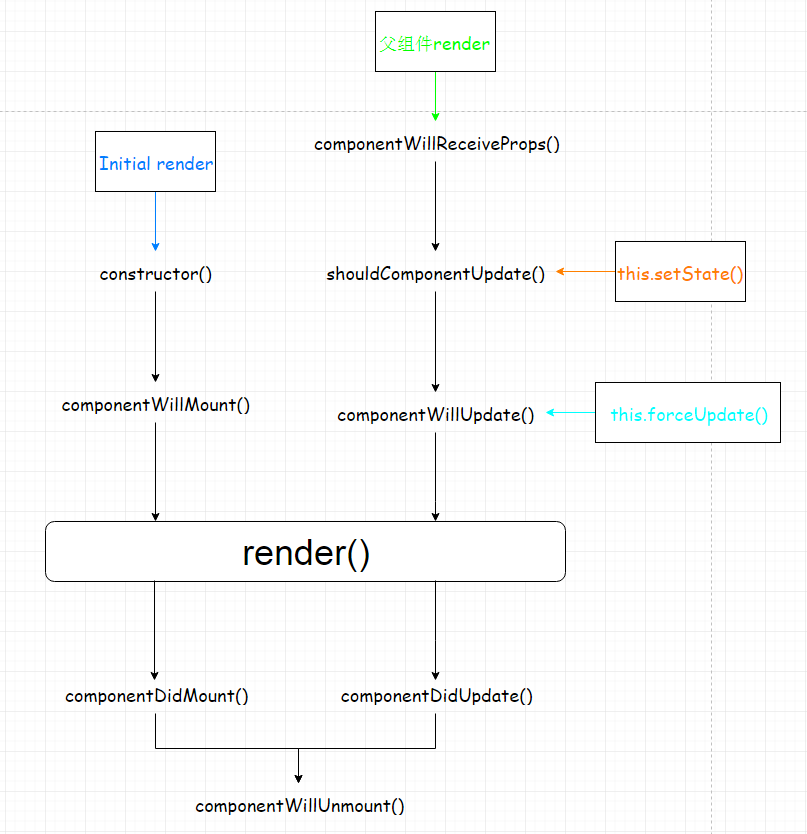
5.React各widget生命周期
componentWillMount 在渲染前调用,在客户端也在服务端。
componentDidMount : 在第一次渲染后调用,只在客户端。之后组件已经生成了对应的DOM结构,可以通过this.getDOMNode()来进行访问。 如果你想和其他JavaScript框架一起使用,可以在这个方法中调用setTimeout, setInterval或者发送AJAX请求等操作(防止异步操作阻塞UI)。
componentWillReceiveProps 在组件接收到一个新的 prop (更新后)时被调用。这个方法在初始化render时不会被调用。
shouldComponentUpdate 返回一个布尔值。在组件接收到新的props或者state时被调用。在初始化时或者使用forceUpdate时不被调用。 可以在你确认不需要更新组件时使用。
componentWillUpdate在组件接收到新的props或者state但还没有render时被调用。在初始化时不会被调用。
componentDidUpdate 在组件完成更新后立即调用。在初始化时不会被调用。
componentWillUnmount在组件从 DOM 中移除的时候立刻被调用。
1.只执行一次: constructor、componentDidMount
2.执行多次:render、getDerivedStateFromProps、shouldComponentUpdate、getSnapshotBeforeUpdate、componentDidUpdate
3.有条件执行:componentWillUnmount
6.React Refs
refsは特殊記号、widgetに値をつけるため、refsを使えばできます。
例:
class MyComponent extends React.Component {
  handleClick() {
    // DOM API を使って、focusを取得
    this.refs.myInput.focus();
  }
  render() {
    return (
      <div>
        <input type="text" ref="myInput" />
        <input
          type="button"
          value="click me and get focus"
          onClick={this.handleClick.bind(this)}
        />
      </div>
    );
  }
}

ReactDOM.render(
  <MyComponent />,
  document.getElementById('example')
);
7.React AJAX
略
まだコメントがありません。
コメントを最初に残す。